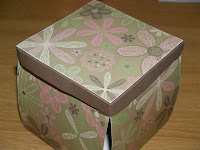
For the very first time ever I did some scrapbooking out of the box. And I really enjoyed it. I never thought that it culd be so much fun.
At first I thought an exploding box would be very difficult to make, but I was ecstatic to find that these are actually very easy. I decided to blog about the steps I used to make the box (since I do not have much to do at work, and the stuff I want to blog I do not have pictures of with me).
The supplies I used:
- 3 pieces of double sided paper (one 12" square, one 11-1/2" square and one 11" square). I used 2 pieces of cardstock and one piece of double sided pattern paper.
- A co-ordinating cardstock measuring 5-1/8" square for the lid.
- Ribbon, rub-ons, embellishments and photos of your choice.
Instructions:
- Mark the 12" square every 4" in every direction to create 9 squares. Score the 4" squares. I marked mine in pencil with a ruler, and then used a scoring tool to make the score lines.
- Mark the 11-1/2" square every 3-1/8" in each direction in order to create 9 equally sized squares.
- Mark the 11" square every 3-1/6" in each direction in order to create 9 squares. I bend them back and forth at the score lines so that they move really easily.
- Cut the corners from all three pieces of cardstock. Set aside these corner pieces to use as matting and embellishments later.
- Decorate the four fold-outs on all three layers, plus the very centre square on the smallest one. I placed wallet sized pictures on the largest and medium sized fold-outs and rub-ons on the smallest fold-out. I cut a photo to fit the centre square of the smallest fold-out, I then made a "worm" which I placed under then centre pictures. This way it is always raised.
- Using glue or foam squares for dimension, adhere the smallest centre square to the medium centre square. Then adhere the medium centre square to the largest centre square.
Creating the lid
- Score the 5-1/8" square lid at 7/8" on all sides. Also score diagonally in each of the four corners.
- Fold sides up along the four edges. Take a corner and fold it in along the diagonal line. use double sided tape to hold the two sides of the diagonal together, add then another piece to hold it against the edge of the lid.
- Repeat for all corners to create a lid for the box.
- Finally, embellish the lid of your box with flowers, ribbon, stickers, paper scrapb, or whatever you want. Fold up the sides of the box and put the lid on the box.
And the inside
This was so much fun!
Happy scrapping!


0 comments:
Post a Comment